How to Seal A Deck
It is important to seal the wood deck after it cleaned. This will help keep it clean, give some amount of
protection to the wood surfaces and maintain its look for a period of up to a couple of years.
Supplies include:
- UV protected sealer
- two disposable brushes; 1" and 3"
- lint free rags
- empty plastic quart pails
- foam stick pads
- disposable rubber gloves
- 3' by 50' plastic sheeting
- masking tape
- optional: mineral spirits for clean up
1) Allow the deck to thoroughly dry.
2) Prepare several plastic runners along with a few spares (before breaking into the sealer material). Place them
in areas like under raised spindle panels, and for beneath the work
pot as you go around the deck. Mask off any spots on the deck that are not to
receive the sealer with a cut of the plastic sheeting and tape it where needed as mentioned in
sealing details.
Thus protecting the grain for an even layer to be applied. Both film sealers and especially penetrating sealers
should be applied in a consistent manner, avoiding areas of build-up like from drippage.
Cut the sheeting to be placed over surrounding plants with vent holes slit in them.
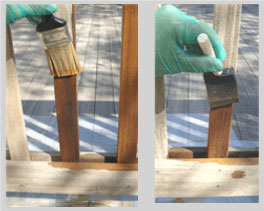
3) The rails, based on your particular design of deck, are dealt with by a combination of brushing with a small 1" brush
and a foam stick pad and the foam part will wear soon so have spares of these.
And be forewarned - many sealers by their composition are thin and viscous, they will run.
Coat the spindles all the way around before getting too far ahead. A wet edge should be maintained, to minimize any overlap effect.
Once the baluster/spindle sections are complete, seal the continuous rail cap and outer lower framing.

4) Brush on the slat floor planks with about a 3" brush, covering roughly three rows in a pass while
maintaining the wet edge. Using deck floor pads on poles will save time, but these will also miss the side
edges down into the wider gaps, unlike doing brushwork. Hitting the inner edges with a brush will give solid,
thorough appearing coverage.
Brush out the plank slats, then the lower stair risers and treads. Followed by the outer boards wrapping the base
along with any outer staircase stringers. - Apply liberal amounts to the end cuts.
Attempt to clean up any minor spills and misplaced sealer as quickly as it happens.
5) Pull any vented plastic covering off the plants as soon as possible.
6) Let dry and look for a uniform coverage. Many sealers do contain an amount of tint for color (or 'stain') while some
do not. Ideally you want absorption for full protection - with no under absorption, and no splotchy flashing across
the wood from too much being applied. Noting that certain penetrating sealers are not intended for protection, per se,
as are most film-type sealers.
7) Perform clean up.
CAUTION: For some solvent-based sealers, cleanup and also use of the sealer might mean taking precautions for combustible materials.
Always follow the manufacturers' instructions.